Being a mom is exhausting, right? From the moment you get up in the morning, you're making meals, cleaning them up, chasing the kids, answering phone calls, keeping up with the bills and the mail, volunteering in the classroom, helping with homework, putting on band-aids, walking children to time-out, force-feeding them vegetables...*sigh*
I remember asking my future sister-in-law, when she had just two children, "how often do you find yourself sitting back and just saying to yourself, 'I LOVE being a mom - I just LOVE this!" I was asking because, with her super-cute kids, I fully expected her to say: "ALL the time!" But she was more honest. "Mmmm...10 percent?" Her answer surprised me at the time, but I totally get it now. First of all, for a mom to even find the moment to sit back and think to herself is rare enough, but furthermore sometimes it's a down-right difficult and thankless job most of the time.
That being said, I am in love with being a mom. And that 10 percent or so that I really do get a moment to think about how lucky I am, there is such an intense feeling of love and fulfillment that it makes it all worth it. In those moments, I want to squeeze my kids with tight hugs until they are flat as a pancake!
My favorite moment during our day is bedtime. The house gets still and quiet. The kids get through the routine pretty much on their own (except my two-year old, but he's fun to help): brush teeth, potty, take flouride, wash face. Then we pile into a kids bed (we change it up), and read. I used to have each child read to me for 10-15 minutes, but this became difficult. I might re-institute the tradition later. Right now, they read to me in the morning after breakfast, and at night I read a few chapters of a great book to them.
There is a lot of evidence out there to show that reading to your children can produce a life-long love of reading in them, not to mention increasing their voabulary and attention span. But the best benefit of all is having a great story to laugh about, talk about, and make references to with your kids. I love the questions they come up with to ask, and the plot twists they suggest.
Here are some books we have really enjoyed so far:
Dealing with Dragons by Patricia C Wrede
The Mouse and the Motorcycle by Beverly Cleary
Caddie Woodlawn by Carol Ryrie Brink
The BFG and Matilda by Roald Dahl
And here are some books I am anxious to dig into with them:
Little Women by Louisa May Alcott
Heidi by Johanna Spyri
The Secret Garden by Frances Hodgson Burnett
The Lion, The Witch, and the Wardrobe by CS Lewis
Island of the Blue Dolphins by Scott O’Dell
James and the Giant Peach by Roald Dahl
The Witch of Blackbird Pond by Elizabeth George Speare
Mr Poppers Penguins by Richard Atwater
Anne of Green Gables by Lucy Maud Montgomery
Where the Red Fern Grows, by Wilson Rawls
Little House Series by Laura Ingalls Wilder
The Boxcar Children by Gertrude Chandler Warner
A Series of Unfortunate Events by Lemony Snicket
A Little Princess by Frances Hodgson Burnett
Percy Jackson series?
The Last Of The Really Great Whangdoodles by Julie Edwards
The Story of Doctor Doolittle by Hugh Lofting
I'd love to hear what you blog-readers enjoyed as children, or what you've had success reading to your kids. Please share!

A place for sharing ideas on raising, educating, and enjoying fun activities with our children.
Saturday, April 30, 2011
Monday, April 25, 2011
Birthday Cake Present, and Our Birthday Traditions
 Here my the newest cake creation. But we'll get to the how-to's and that what-is-it stuff later.
Because at our house, your birthday starts WAY before the actual event. This year we have started a tradition of having a "birthday tree." Right now all that really means is that you get a funky colored Christmas tree put in your bedroom for the week leading up to your birthday, and for however long it takes me to put it away after that. 
Our tree is neon blue, but I have seen a variety of colors - purchase in January for a good deal. As presents are wrapped they are placed under the tree, and the degree of excitement and anticipation is built ten fold from that point on. Next year I would like to build on the tradition and have the family place notes and pictures on the tree to decorate it.

Our tree is neon blue, but I have seen a variety of colors - purchase in January for a good deal. As presents are wrapped they are placed under the tree, and the degree of excitement and anticipation is built ten fold from that point on. Next year I would like to build on the tradition and have the family place notes and pictures on the tree to decorate it.
The next tradition we have is to decorate the room of the birthday person as they are sleeping, so they wake up to a bunch of balloons, crepe paper, signs, and silliness. When I first started this tradition, Alyssa was 2 and still waking up often in the night. She happened to wake up around midnight and notice all the decorations before the daylight hit. It didn't scare her. It angered her. She marched into our bedroom, furious, and demanded that we take down all the decorations. The following year, she smiled at us before she went to bed and asked "and in the morning, after I see my balloons, will you make pancakes?" What? I thought she hated that! I scrambled around the house to find what I could to decorate with, and we haven't missed a birthday since.
We also have a new tradition of getting measured against the wall on your birthday. This might get less fun when my second daughter surpasses my first daughter in height. This will likely happen by next year, even with a 2-year age difference between them.
I've already explained my need for decorating a birthday cake in the post "Ghosts of Birthday Cake Past." This year was no exception. When Brianne saw the Barbie birthday cake I had posted, it made her want one. Oh great, here we go again! But at some point during the day my imagination stirred, and I became excited about the idea again.
I've recently been reading "Dealing with Dragons" outloud to my kids before they go to bed. I recommend it to any child who has a fascination with witches, wizards, princesses, knights, dragons, and sarcasm. Brianne has loved the book, so I decided to not call this a Barbie cake, but to dub it "Princess Cimorene and Kazul the Dragon," characters from our new favorite read. She loved the idea, and I got started:

So here is the finished Princess Cimorene. The shape of this cake is nothing special - you just need to buy the right mold. The Barbie in the middle has nothing but a stake to hold her in place below the waist. But I decided to try something new with the frosting, because I love to experiment. I have mentioned before my distaste for the fondant that has become so popular on cakes, and tastes..well, tastes like...well, it's just gross. Jessica commented on this blog a few days back with a Marshmallow Fondant that raised my curiosity. I decided to try it. Here's the recipe as she posted it:
Marshmallow Fondant:
10oz Mini Marshmallows
2 tbls Water
4 cups Powdered Sugar
1 tsp Vanilla
Melt marshmallows and water in Microwave. Mix in sugar little by little until fully incorporated add vanilla and mix. Roll out mixture onto board/counter with more sugar if needed and use.
I followed the directions as best I could, but hit a couple snags:
1. It didn't roll out the way I expected it to. At first it was too sticky for me to roll out. So I added more powdered sugar and it was too thick for me to work with. Now, I'm no expert, so somebody else should try this and post a second opinion. So I came up with something else - I re-micowaved it, and threw it on the cake as quickly as I could before it set. That worked! But it looked lumpy and uneven. So I came up with ANOTHER idea. Stick it in a warm oven to smooth it over! This worked prety well, but I did hit snage number two:
2. I toasted the mashmallow and got a few brown spots. Oops. Had to use some extra frosting flowers (with Nerds for decorative centers) on the "dress"
I will say, it was the best tasting "fondant" I've ever had. Even though it took me a while to figure out how it went on the cake!
Well Cimorene would be nothing without her dragon, Kazul. But, knowing that my small family would never even finish the Princess Cake, let alone another, I decided to make the dragon out of styrafoam. No one in family could tell it wasn't edible, and I didn't have to bake another cake. Here are some directions on putting together the dragon:
1. First of all, there's a great trick you need to know if you're going to work with styrafoam. This stuff is HORRIBLE to slice, cut, saw...so messy! But it is incredibly easy to melt. Take a knife you don't care about and heat it up.

There are probably lots of ways to heat up a knife or other tool. This seemed easiest to me. I'm open to more suggestions. Now you're going to need some foam. The directions to make the cake said to use two 9" rounds - but I had 12" circular foam pieces, so I just used those. Really, you could just piece it together with flat styrafoam even easier. Here's how it went down:


Okay, listen, you don't have to tell me - I already know. This next part was a little ridiculous. But I had to put the cake on a large surface, and why not incorporate a background? I used a sectioned posterboard I bought at the dollar store (the type for science project displays), and colored pictures that I Googled when searching for "coloring pages princess" etc.

Now comes the dragon!


Securing the styrfoam pieces together wasn't as easy as I thought. I didn't have the patience for Elmer's Glue. The hot glue gun melted the pieces. In the end I used a lot of toothpicks and skewers. I didn't have to transport it all, so it worked fine for me. Now just frost (or paint, or modge-podge, or whatever!). I decorated him with fruit slices for claws, marshmallow halves for eyes, and large chocolate chips for nostrils. The wings are just colored paper, cut and secured with wooden skewers.
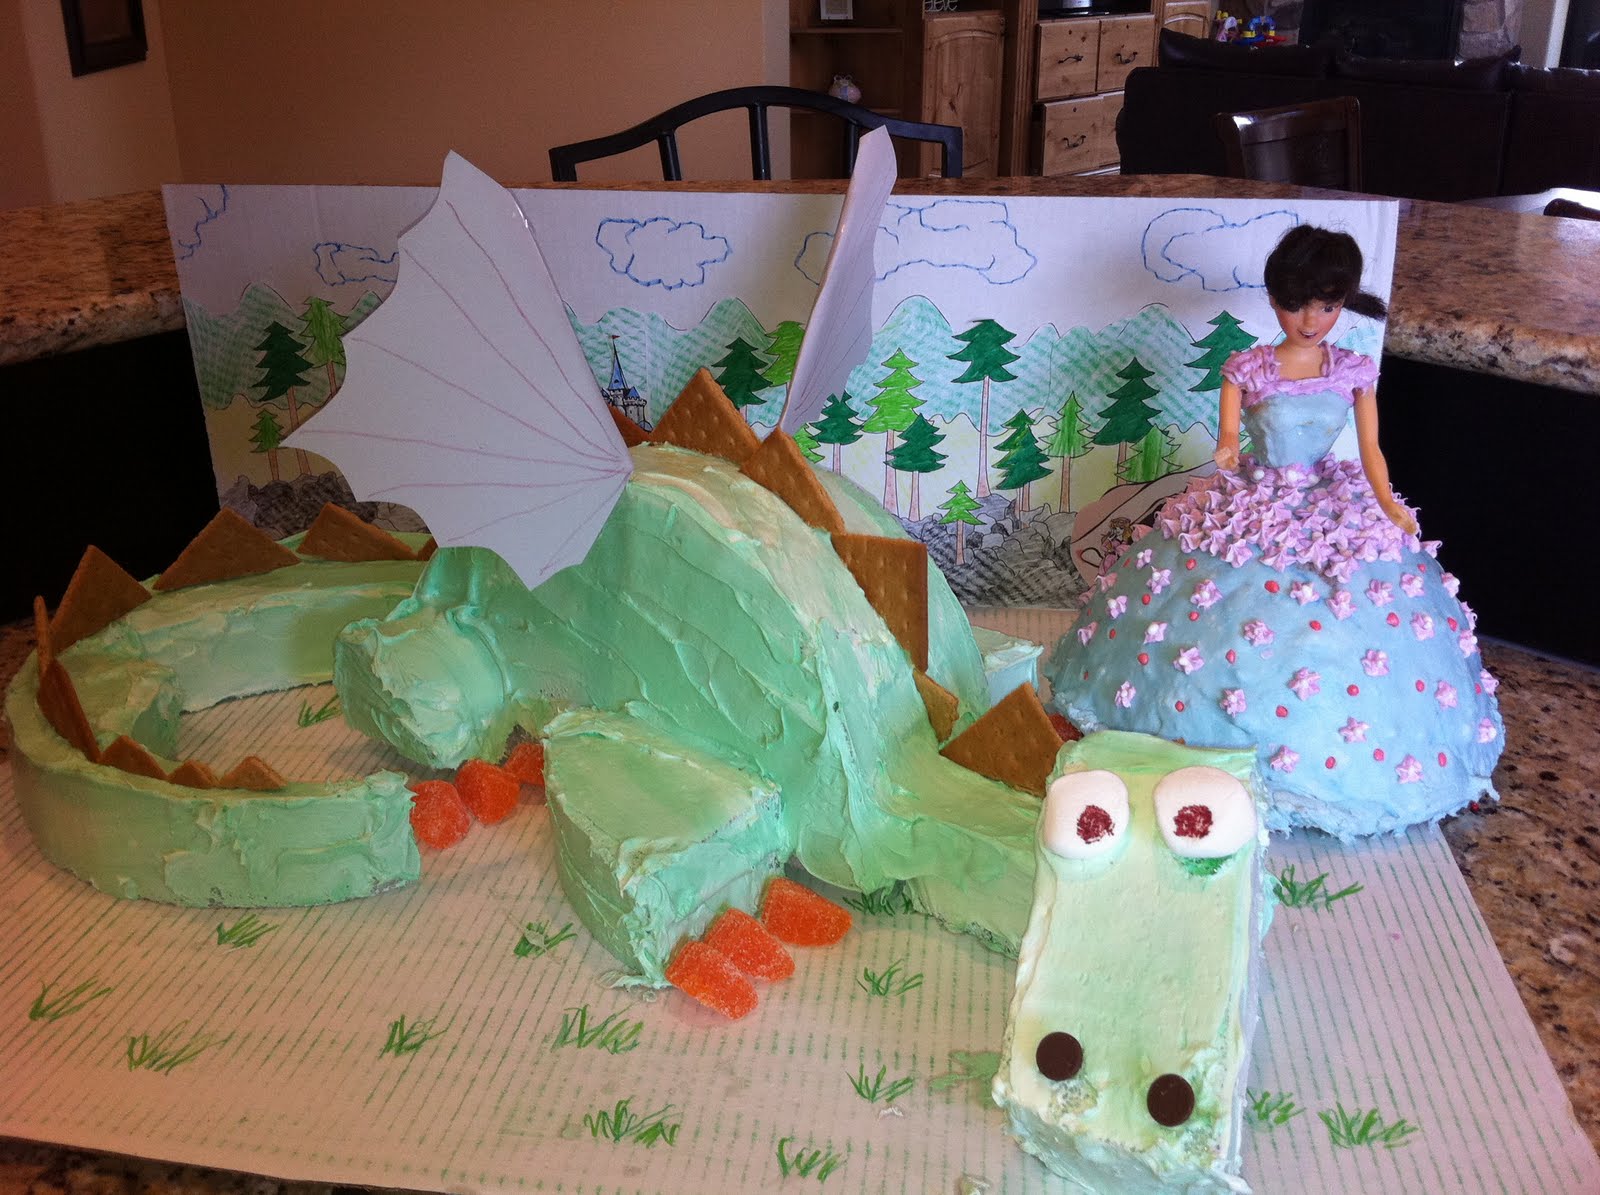
Ta-DA!
Friday, April 22, 2011
Easter Eggs by Aunt Darla and Family
I had fun decorating Easter Eggs with my kids a few weeks ago. My Aunt Darla and her daughters did the same, and came up with these inspired creations at her home. Very imaginative! Love them.


Thursday, April 21, 2011
Easter Eggs!
Today was a great day. Nobody is sick anymore, and there were no after-school activities (math club, dance class) to take me away from a fun activity with my kids. So what did we do? Easter eggs of course!

Now let me preface this post by saying that I know I'm no Martha-Stewart. You want Martha-Stewart looking eggs? You're looking for my sister...she, guaranteed, will make the most beautiful easter eggs you've ever seen. But me? I'm in it for the mess, and the memory with my kids. So here are some things we experimented with (as inspired by a 2007 edition of "Family Fun" magazine):
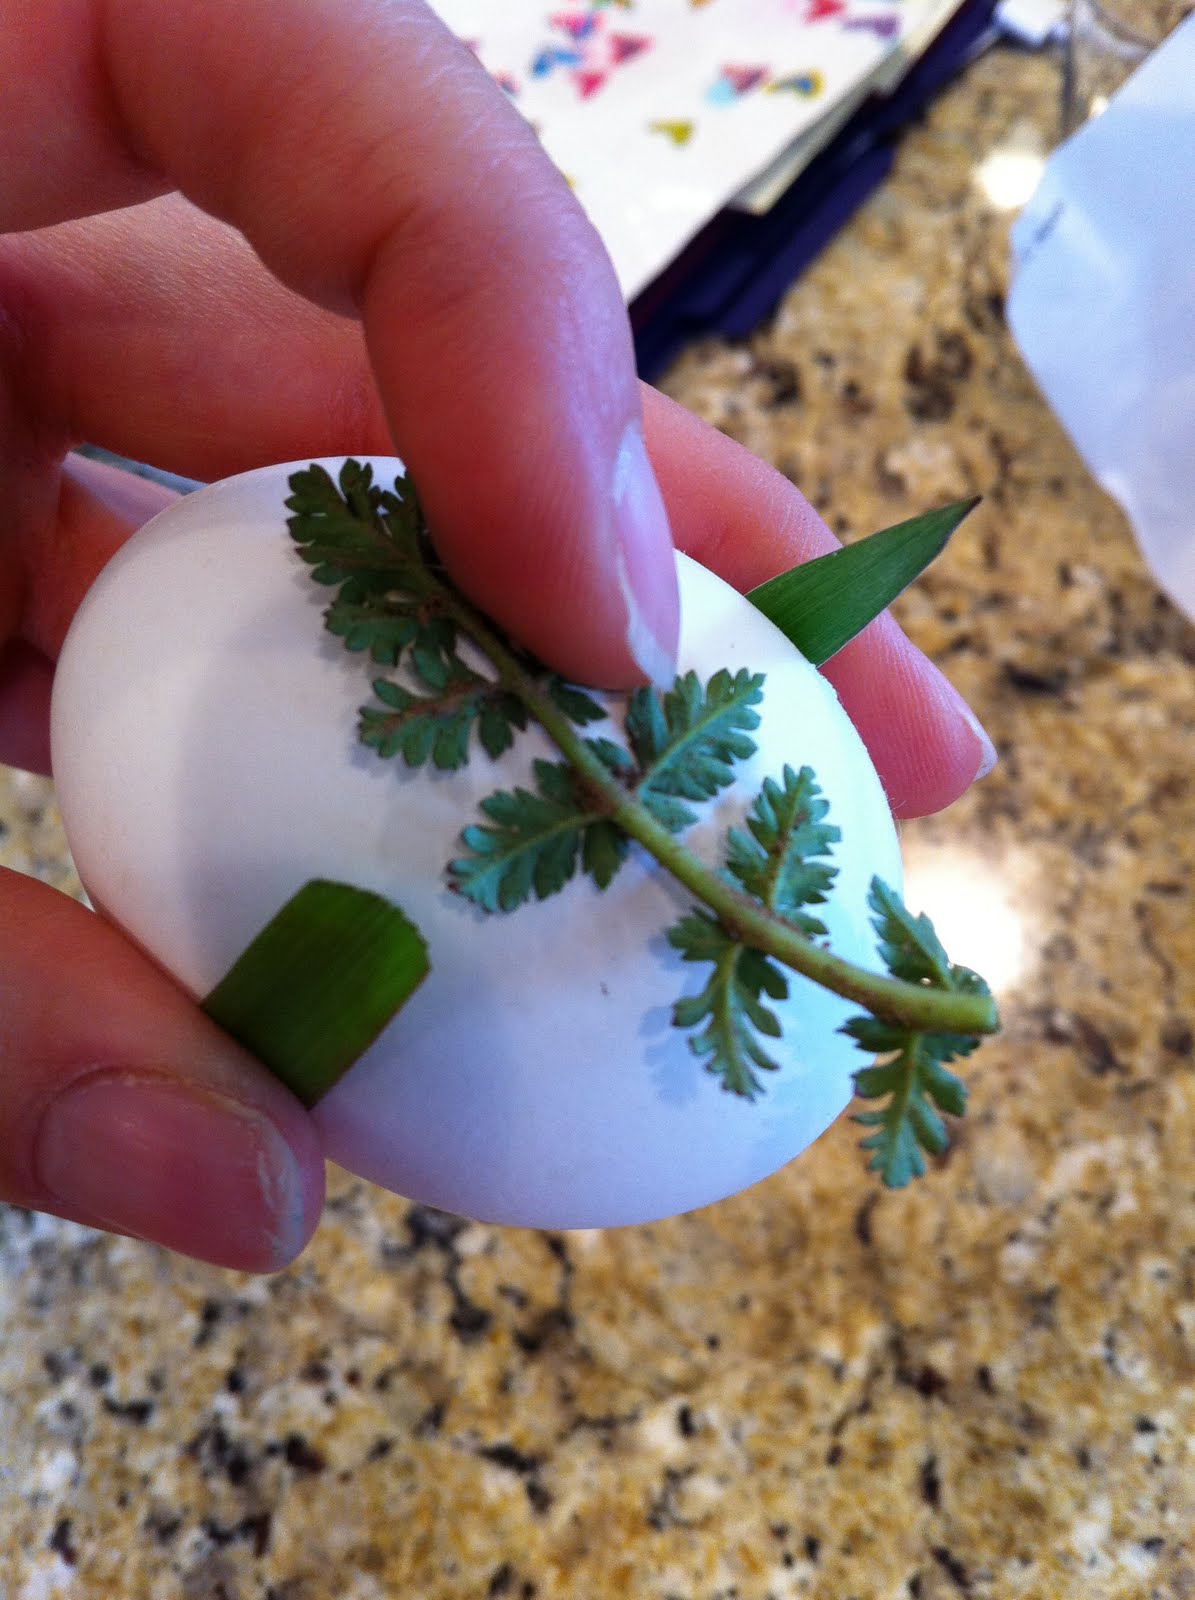
Nature Eggs
Items Needed:
A few interesting shaped leaves or flowers
An old pair of nylons
Egg Dye (you can get this anywhere, but I found mine at the Dollar Store)
We went out into the backyard on the look out for interesting shaped leaves. We found weeds. That'll work! We pulled a few of them and brought them in the kitchen with our hardboiled eggs.

Now wrap your nature item(s) around the egg and cover it with a section of your old nylons (I cut about a 4" band). I secured it with a small rubberband.

Now dip it in any egg dye of your chosing.


You can also dye the egg BEFORE you put the nature items and nylon around it, then coat it in a darker color of dye. I tried it, but it might have turned out better with different colors:

The discovery of the nylon band saved my with my little guy, who was the messiest most horrible egg decorator! He had more fun, and stayed cleaner, using the nylon method, even without nature items inside it.
MELTED CRAYON EGGS
Items needed:
Old crayons (you won't need much, but a variety of colors is nice)
A papertowel, cloth, or some other way to handle a hot egg while decorating

I love these eggs! It's as simple as it sounds. Shortly after hard-boiling your eggs, start coloring on them with the crayons. It will pour over your eggs like shiny, thick paint!


Two problems with it though: (1) a hot egg is a little tricky for the young ones to handle. They might not be able to decorate the whole egg, but just make a picture or design on one side. (2) If you want to decorate the whole egg, it's hard to know how to hold or handle the hot egg as you rotate it because all the crayon is still melted and messy. Touch it and you ruin it. Wait until it cools, and you won't be able to melt the crayon on the hot egg.
The only solution I see is to have a candle or other hot item to directly melt the crayon, then color on the cold egg? I didn't try it.
Here's my favorite egg! I just used a consistent swirling motion with my red, purple, and yellow crayons:

RUBBER CEMENT EGGS:
Items Needed:
Rubber Cement Glue (or a clear/white crayon for less precise lines)
Egg Dye

I never would have thought to use rubber cement on easter eggs, but it is very effective in keeping the egg dye out of the space it has covered. The directions I read said to peel the glue off after it dried, but I found the layer of glue was so thin it didn't bother me, so I just left it on.
This is so kid friendly. Just dip your eggs in a color of your choice. Wait until it dries. Now paint it rubber cement and dip it again. You could probably even do it a third time using a new color, as long as the colors you were using got progressively darker. I didn't try the third time around.
Unfortunately I forgot to take individual pictures of the eggs we made using the rubber cement method. You'll have to look carefully at the eggs in the below picture. They're easy to spot. Two have stripes, a third is already pictured above, and thr fourth (very similar to the third) is pink and black.

Happy Easter and enjoy the eggs!

Now let me preface this post by saying that I know I'm no Martha-Stewart. You want Martha-Stewart looking eggs? You're looking for my sister...she, guaranteed, will make the most beautiful easter eggs you've ever seen. But me? I'm in it for the mess, and the memory with my kids. So here are some things we experimented with (as inspired by a 2007 edition of "Family Fun" magazine):
Nature Eggs
Items Needed:
A few interesting shaped leaves or flowers
An old pair of nylons
Egg Dye (you can get this anywhere, but I found mine at the Dollar Store)
We went out into the backyard on the look out for interesting shaped leaves. We found weeds. That'll work! We pulled a few of them and brought them in the kitchen with our hardboiled eggs.
Now wrap your nature item(s) around the egg and cover it with a section of your old nylons (I cut about a 4" band). I secured it with a small rubberband.

Now dip it in any egg dye of your chosing.


You can also dye the egg BEFORE you put the nature items and nylon around it, then coat it in a darker color of dye. I tried it, but it might have turned out better with different colors:

The discovery of the nylon band saved my with my little guy, who was the messiest most horrible egg decorator! He had more fun, and stayed cleaner, using the nylon method, even without nature items inside it.

MELTED CRAYON EGGS
Items needed:
Old crayons (you won't need much, but a variety of colors is nice)
A papertowel, cloth, or some other way to handle a hot egg while decorating

I love these eggs! It's as simple as it sounds. Shortly after hard-boiling your eggs, start coloring on them with the crayons. It will pour over your eggs like shiny, thick paint!


Two problems with it though: (1) a hot egg is a little tricky for the young ones to handle. They might not be able to decorate the whole egg, but just make a picture or design on one side. (2) If you want to decorate the whole egg, it's hard to know how to hold or handle the hot egg as you rotate it because all the crayon is still melted and messy. Touch it and you ruin it. Wait until it cools, and you won't be able to melt the crayon on the hot egg.
The only solution I see is to have a candle or other hot item to directly melt the crayon, then color on the cold egg? I didn't try it.
Here's my favorite egg! I just used a consistent swirling motion with my red, purple, and yellow crayons:

RUBBER CEMENT EGGS:
Items Needed:
Rubber Cement Glue (or a clear/white crayon for less precise lines)
Egg Dye

I never would have thought to use rubber cement on easter eggs, but it is very effective in keeping the egg dye out of the space it has covered. The directions I read said to peel the glue off after it dried, but I found the layer of glue was so thin it didn't bother me, so I just left it on.
This is so kid friendly. Just dip your eggs in a color of your choice. Wait until it dries. Now paint it rubber cement and dip it again. You could probably even do it a third time using a new color, as long as the colors you were using got progressively darker. I didn't try the third time around.
Unfortunately I forgot to take individual pictures of the eggs we made using the rubber cement method. You'll have to look carefully at the eggs in the below picture. They're easy to spot. Two have stripes, a third is already pictured above, and thr fourth (very similar to the third) is pink and black.

Happy Easter and enjoy the eggs!
Sunday, April 17, 2011
A Lazy Day of Painting

Today our two girls woke up with fevers and coughs. Brianne slept in until past 11am (with short moments of wakefulness starting around 7am). There is nothing sadder than a child who doesn't feel well, so it didn't take long to declare it a pajama day. We stayed in our pajamas ALL day long, and painted beads for our summer necklaces!
I was planning on painting the beads myself - maybe taking 20 minutes per bead and making them ridiculously cute. Couple of problems with this though:
Problem Number 1: I am not crafty. I have tried to be on several occassions. I've tried my hand at scrapbooking, party invitations, halloween costumes...Nothing really seems to go my way.
Problem Number 2: Really don't have the time to take 20 minutes per bead. And if I did have the time, I'd spend it doing something more productive - like eating. I love food. Always have, always will.
Problem Number 3: The beads won't mean anything to my kids if they didn't get to participate in all the prep work. The excitement of it before the summer makes it just as much fun as actually doing the activities together in the upcoming months.

So, armed with some plain wooden beads, popsicle sticks, random objects found around my house, and a freshly charged cordless drill (for hole-making), I began. And the girls helped me. Gavin tried too - but he stunk. He even put a freshly painted red bead up to his lips for a kiss...because he loved it so much?

As it turns out, we had a lot of fun. And a number of hiden pros in getting their help:
Pro Number 1: You have no idea which beads I painted, and which beads my kids painted, thereby eliminating all judgement of my poor artistic skills :)
Pro Number 2: They thought of ways to decorate these beads that I had not imagined. It was fun to watch their creative juices flow.
Pro Number 3: We made a memory. Woke up sick, wore pajamas all day, and painted beads with mom. We all had a lot of fun.
Pro Number 4: A time saver. This summer school project of mine is going to lose it's momentum quickly if I start thinking of it like a chore. I can't spend too much time preping or doing any particular activity, or I'll just get grouchy about it.
This whole project is really about enjoying the journey, and making fun memories with my kids. If they learn something - even better!
I started off handing the kids their beads to paint on the ends of wooden skewers. I thought this would cut down on the mess, and make it easier for them to handle the bead. It did both of these things, but in the end we all preferred just getting messy. The acrylic paint washed off our hands easily when we were done, and it was fun to dig in!
Friday, April 15, 2011
Ghosts of Birthday Cake Past
Since this is a blog about sharing all kinds of ideas about raising a family, I thought I'd share a tradition that our family is having fun with when it comes to birthdays in the family.
Growing up, my mom made a big deal about the birthday cake. It was always homemade, and she would have us dream up any theme under the sun. Then she's get creative, and we were always excited to see what she had created. Something about her doing that for us kids must have made a deep impact on me, because I HAVE to do it for my kids. I HAVE to. Now I don't have my mother's gift with decorating tools, but I can be resourceful when I need to be.
Here are some cakes from our past birthdays:
I think I'll start with my least favorite. See, I'm not a big fan of Barbies. Wait, let me clarify. I love watching "Barbie's Princess and the Pauper" and "Barbie Isalnd Princess" with my girls - the songs are catchy. But I would rather run 15 miles than play 15 minutes of Barbies. My least favorite mom chore by far. But, what do you do when a three year old asks for a Barbie cake? You try to manipulate their interests for two weeks, then you cave in, and make this:

Now on to my second least favorite. Is that proper english? My son Gavin is in love with all things transportation: planes, cars, bikes, and of course trains. I experimented with this car cake mold, which I'm not a huge fan of because to use these molding pans, you really need to make a thick dry cake, so you can see the shape better. I (as you will learn) am a big food fan, and would much rather something TASTE good than look good. Therefore, these didn't turn out as cute as someone else might have been able to make them. Fortunately, nobody cared :)
Life Saver wheels, lollipop drivers with frosting faces...not too much to brag about here, except to say that I had fun!
Now - did I already mention that I prefer food to taste good, rather than look good? So I'm fascinated by those "mad-hatter" looking cakes I see people making on tv. They are so fun and whimsical looking. Problem is, more thick, dry cake recipies, and WORST OF ALL the fondant. Fondant is beautiful. Fondant is easy to work with. Fondant tastes gross. So I decided to see if it is possible to make a delicious but still whimsical looking cake.
I'm thinking now...it's not. But I have something mastered that those cake chef's don't. The tilted structure of thier cakes is an illusion - mine is NOT. It's the realy deal. In fact, it nearly completely slid off the plate before I served it. So there.
Now comes a cake that looks harder than it really is. Nothing hard about it as a matter of fact. This was the year my daughter requested a "Wedding Cake." Here's what it turned out like:

Now this next one, I actually am I little excited about. It took me an embarassing amount of time, but I loved every minute of it. Here is Gavin's first birthday cake, a Pirate Ship.

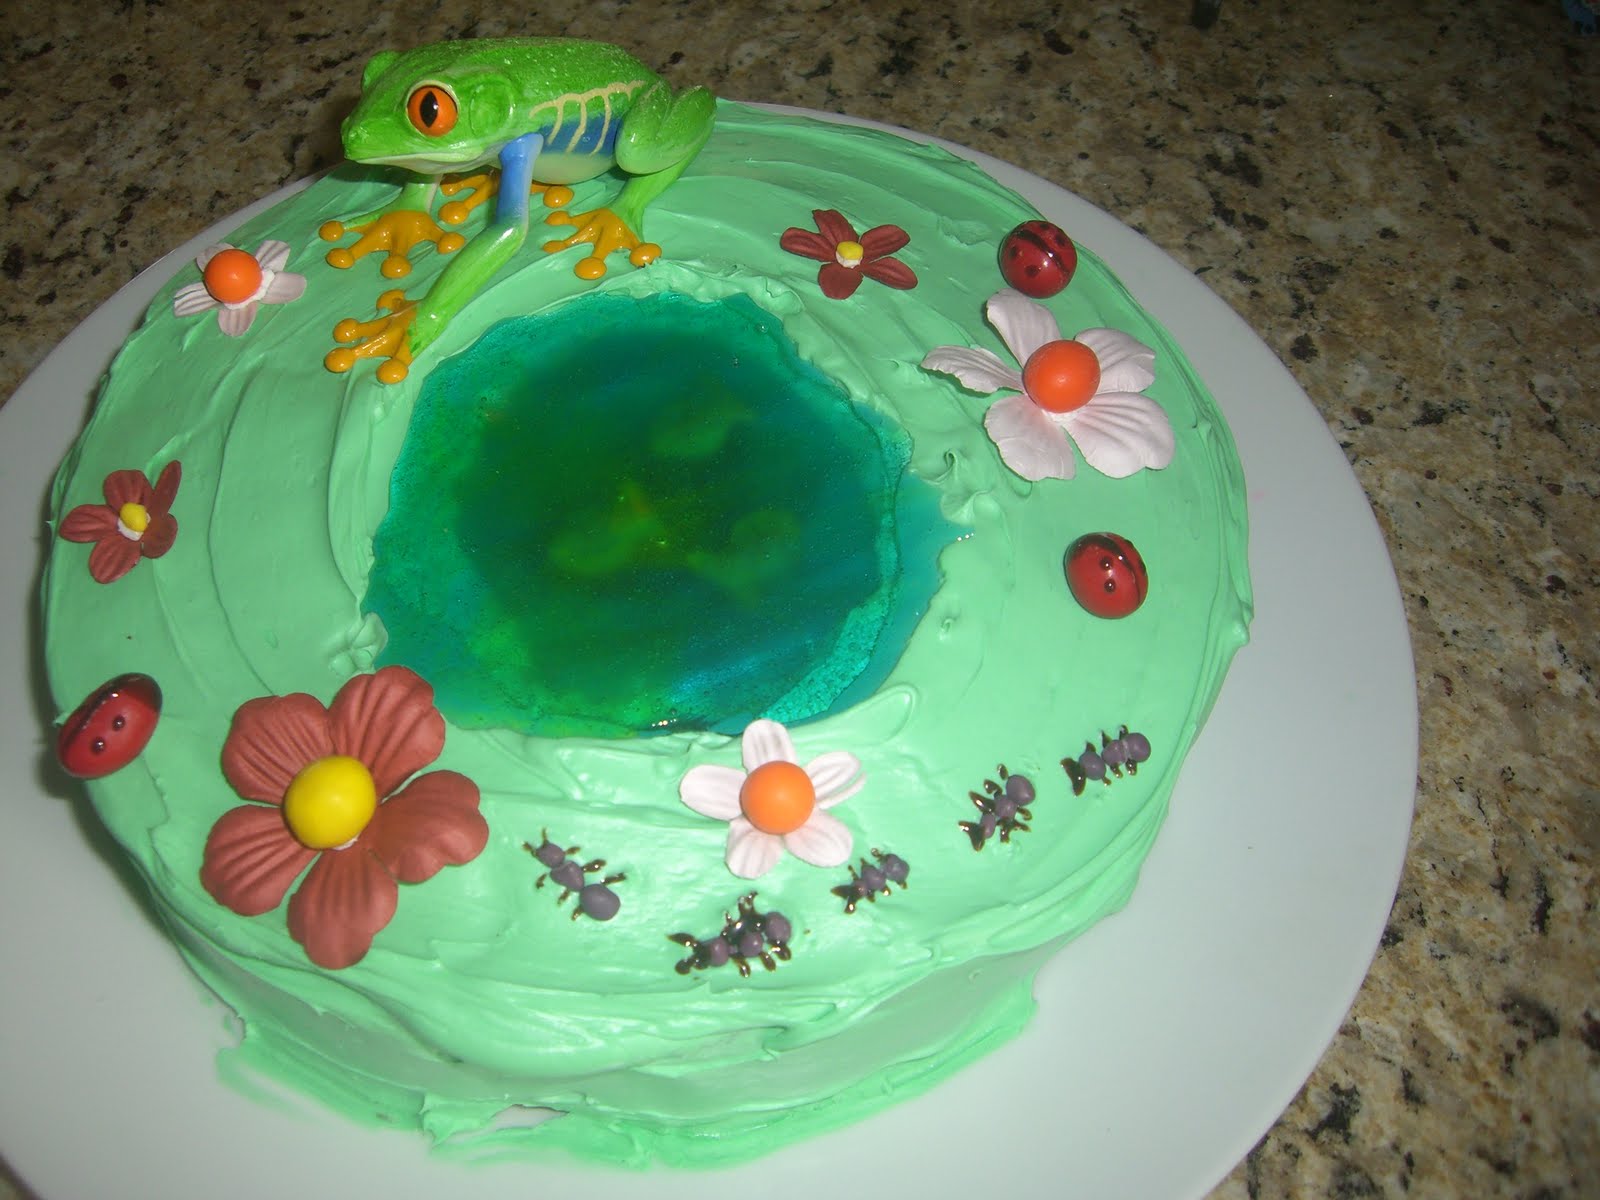
Next is a "garden" birthday cake. Frosting ants, and goldfish crackers hiding under a melted Jolly Ranchers pond. The frog, by the way, is a plastic toy - but I would have been really impressed with myself if I'd created that out of something edible.

Do the cakes take up a lot of time? Yes. Are they really very impressive? Nope - I've seen way better. But they sure mean something to me. And, who knows, maybe someday my kids will try to make birthdays fun for their kids with a little imagination of their own.
Growing up, my mom made a big deal about the birthday cake. It was always homemade, and she would have us dream up any theme under the sun. Then she's get creative, and we were always excited to see what she had created. Something about her doing that for us kids must have made a deep impact on me, because I HAVE to do it for my kids. I HAVE to. Now I don't have my mother's gift with decorating tools, but I can be resourceful when I need to be.
Here are some cakes from our past birthdays:
I think I'll start with my least favorite. See, I'm not a big fan of Barbies. Wait, let me clarify. I love watching "Barbie's Princess and the Pauper" and "Barbie Isalnd Princess" with my girls - the songs are catchy. But I would rather run 15 miles than play 15 minutes of Barbies. My least favorite mom chore by far. But, what do you do when a three year old asks for a Barbie cake? You try to manipulate their interests for two weeks, then you cave in, and make this:

Now on to my second least favorite. Is that proper english? My son Gavin is in love with all things transportation: planes, cars, bikes, and of course trains. I experimented with this car cake mold, which I'm not a huge fan of because to use these molding pans, you really need to make a thick dry cake, so you can see the shape better. I (as you will learn) am a big food fan, and would much rather something TASTE good than look good. Therefore, these didn't turn out as cute as someone else might have been able to make them. Fortunately, nobody cared :)

Life Saver wheels, lollipop drivers with frosting faces...not too much to brag about here, except to say that I had fun!

Now - did I already mention that I prefer food to taste good, rather than look good? So I'm fascinated by those "mad-hatter" looking cakes I see people making on tv. They are so fun and whimsical looking. Problem is, more thick, dry cake recipies, and WORST OF ALL the fondant. Fondant is beautiful. Fondant is easy to work with. Fondant tastes gross. So I decided to see if it is possible to make a delicious but still whimsical looking cake.

I'm thinking now...it's not. But I have something mastered that those cake chef's don't. The tilted structure of thier cakes is an illusion - mine is NOT. It's the realy deal. In fact, it nearly completely slid off the plate before I served it. So there.
Now comes a cake that looks harder than it really is. Nothing hard about it as a matter of fact. This was the year my daughter requested a "Wedding Cake." Here's what it turned out like:

Now this next one, I actually am I little excited about. It took me an embarassing amount of time, but I loved every minute of it. Here is Gavin's first birthday cake, a Pirate Ship.


Next is a "garden" birthday cake. Frosting ants, and goldfish crackers hiding under a melted Jolly Ranchers pond. The frog, by the way, is a plastic toy - but I would have been really impressed with myself if I'd created that out of something edible.
Do the cakes take up a lot of time? Yes. Are they really very impressive? Nope - I've seen way better. But they sure mean something to me. And, who knows, maybe someday my kids will try to make birthdays fun for their kids with a little imagination of their own.
Sunday, April 10, 2011
Winter Snowmen


Now before I get to all the summer fun, I might as well tell you about some fun things we did this winter. These snowmen are ridiculously easy. You can use spray paint for vivid colors (and terribly messy hands - make sure to take off your nice gloves), or let your kids use food coloring and water in a spray bottle. The food coloring option lets them be more involved, but it definately turns out more watery.


Shown above is Alyssa's "snow volcano", colored with food coloring in a water bottle. Next is our April snow-storm Easter bunny...which actually fell over about an hour after this picture was taken. And, of course, Winnie the Pooh and Mike Wazowski from Monsters, Inc. Lastly a Pete's Dragon inspired creation...which also toppled over shortly after it's completion!
By the End of The Summer, My Kids Will Be Able to Do ALL of These Things!
So here's how the summer is going to work:
Every week will have a theme (these to be posted later). And during the themed week there will be corresponding art projects, educational experiences, and life skills to learn. Much like a girl scout earning merit badges, each skill learned, or each project accomplished, will earn them a bead, which they can proudly put on their "Summer 2011" necklace. I have outlined the whole summer, and even shopped for the beads. I may add more beads to the list, but they will earn one for each of the following tasks:
I can recognize fractions! (whole, 1/2, 1/4, 3/4)

I can make a graph!
I can sew! (sew a lunch bag)
I can tell you about the food pyramid!
I can cook a meal! (simple, but complete)
I can exercise!
I did my weekly spelling words! (to be awarded mulitple times)
I can identify types of clouds!
I can name countries from around the world!
I can tell time!
I can tie my shoe!
I can do a pointilism painting!
I can make a yarn bowl!
I can sketch a picture!
I can read temperature on a thermometer!
I can describe different enviornments and habitats!
I can identify solids, liquids, and gases!
I can do a puzzle!
I can MAKE a puzzle!
I can dissect an insect!
I can identify the parts of an insect!
I know the phases of the moon!
I can find a constellation!
I can cook using the sun! (solar chef)
I can read a compass!!
I know where I live, and my phone number!
I can read a map!
I know how to have good manners!
I can recognize currency and its value!
I know how to clap a rhythm! (music theory)!
I know how to do laundry!
I can weave a rug!
I can be a good citizen! (service project)
I can recycle!
I can measure length with a ruler!
I can measure weight with a scale!
And the following beads can be given spontaneously:
I can be a good friend!
I can help my family!
I can try something new!
I can eat a food I don't like!
I can keep my room clean!
My hope for this summer is of course that my children will learn new things, but mainly that they will have FUN doing it! And they'll have a colorful, fun keepsake to help them remember and be proud of all they accomplished over the weeks of the summer. Stay posted for the weekly themes, lesson plans, recipes, crafts, and links to some great websites for learning.
Every week will have a theme (these to be posted later). And during the themed week there will be corresponding art projects, educational experiences, and life skills to learn. Much like a girl scout earning merit badges, each skill learned, or each project accomplished, will earn them a bead, which they can proudly put on their "Summer 2011" necklace. I have outlined the whole summer, and even shopped for the beads. I may add more beads to the list, but they will earn one for each of the following tasks:

I can recognize fractions! (whole, 1/2, 1/4, 3/4)

I can make a graph!
I can sew! (sew a lunch bag)
I can tell you about the food pyramid!
I can cook a meal! (simple, but complete)
I can exercise!
I did my weekly spelling words! (to be awarded mulitple times)
I can identify types of clouds!
I can name countries from around the world!

I can tell time!
I can tie my shoe!
I can do a pointilism painting!
I can make a yarn bowl!
I can sketch a picture!
I can read temperature on a thermometer!

I can describe different enviornments and habitats!
I can identify solids, liquids, and gases!
I can do a puzzle!
I can MAKE a puzzle!
I can dissect an insect!

I can identify the parts of an insect!
I know the phases of the moon!
I can find a constellation!
I can cook using the sun! (solar chef)
I can read a compass!!

I know where I live, and my phone number!
I can read a map!
I know how to have good manners!
I can recognize currency and its value!
I know how to clap a rhythm! (music theory)!

I know how to do laundry!
I can weave a rug!
I can be a good citizen! (service project)
I can recycle!
I can measure length with a ruler!

I can measure weight with a scale!
And the following beads can be given spontaneously:
I can be a good friend!
I can help my family!
I can try something new!
I can eat a food I don't like!
I can keep my room clean!
My hope for this summer is of course that my children will learn new things, but mainly that they will have FUN doing it! And they'll have a colorful, fun keepsake to help them remember and be proud of all they accomplished over the weeks of the summer. Stay posted for the weekly themes, lesson plans, recipes, crafts, and links to some great websites for learning.
Subscribe to:
Posts (Atom)